Friday, September 22, 2006

Browser Organization.

Few know, not only how to work with the browser organizer but also how to make it work effectively for you.

One of the biggest issues I have when auditing and dealing with clients f*/&^ing messy files is the lack of discipline applied when creating levels and the naming convention thereof. How on earth is anyone supposed to know what the heck “Level U/S SS RC-B” is supposed to be, and on top of that there are 3 of them with varying case sensitivity.

Now, I have had it happen a few times that a Revit user has left a firm, and we now have to clean the file up, so that it makes enough sense, for others to continue on. It’s like those frikkin layers in ACAD, if the standards are not adhered to then …….. MESS!!!!!!!!

The Browser Organizer becomes our “Big mate” for a few hours. By sorting anf filtering options we can quickly determine what view was actually meant for what purpose

In big Projects, Browzer Organization is an absolute “No Brainer”. It allows you to effectively streamline the otherwise out of control and massive list of views that go with the territory.

The method for Browzer Organization that I have found suites our offices the most effectively is by organizing the views by scale then by associated level. This allows us to work on the parts of the project that are required in that instance of the project time line.

The following illustrations define what I consider as the best manner in which to organize those views.


Wednesday, September 20, 2006

Family Editor Revisited

I have prepared a number of articles on the family editor mainly targeted for those just starting out, and for those just looking to pick up a few tips along the way. I will be posting a number of these articles over the next few weeks.

Do enjoy!!

Starting with.

Family Templates and Categories

There are three types of families in Revit.

1. System families which consist of
o Walls
o Floors
o Ramps
o Roofs
o Stairs
o Railings
o Ceilings

2. In-place Families
On the fly, project based custom families.

3. Model Families

New Revit families are started using a family template.
There are three types of family templates one can use to build and customize your library:

1. Annotation family templates
2. Title block family templates
3. Model Family templates

All have the extension or file type in Revit of *.rft , simply for Revit Family Template.

When starting a new model family, Revit by default, opens the model template directory, offering you the chance to select the correct template file for the correct category of the component.
Some of these family template catagories have more than one template file and these are known as host family templates.
These templates allow you to build families which host to system families.
Wall based; Floor based; Ceiling based, Face Based and Roof based family templates. Host families require the host element in the project file to attach to. This way one can add a wall based plumbing fixture to a wall in the project. When the wall moves the fixture moves with it, saving time when editing.

These templates are used for a number of reasons
1. Starting guides to set up the families.
2. Categorize the family component into building categories that Revit can understand in the database for reasons of scheduling.
3. For you to organize your library.

Revit provides a library of about 110mb of families all divided into directories of the categories.
Over the last 5 years I have increased my own to over 4gig’s of components, so organizing the library becomes a massive task. These directories are a guideline for you to further evolve the library.
e.g. Under Casework I have 4 more:
o Floor units
o Wall units
o Worktops
o Counters
o BIC’s

Categories
Model Families built in a specific category can be changed to another for various reasons and scheduling purposes.

Too change a family’s category.
1. Open the family save it as another.
2. Select Settings\Family Categories and Parameters……
3. Select the new category from the list and hit OK.
4. Load the family into your project.

List of Standard Library Catagories

Thursday, September 14, 2006

Detail Components Uploaded

I keep coming across people that are still modeling in Revit and detailing in CAD. Why oh why, would you want to do something so STUPID?

Revit has the massive ability to use both 3d elements and an overlay of 2d components. The process of detailing in Revit is actually so much easier than anything I have used in the past!!!!

Detail components are your biggest weapon to finally cross over to full 100% Construction Documentation done inside Revit.
Spend time in building your detail component library. Hey! it doesn’t take that much time either. You have got all the ammo, stored in your unintelligent software as blocks.

It’s a case of starting a new detail component family template and importing that CAD detail you need. Either, trace over it, or explode the CAD symbol, save it and overlay it back in your project.

KISS (keep it simple stupid) applies here. There is no necessity to go off on a tangent and spend 6 hours building a complicated 3D family to be able to detail it further when all you need for construction are 2d details.

Here is a simple example of a Window Cill detail. This is a block I have had in CAD for Years. Now in the detail view in Revit I switch off the model category – windows, and overlay my Window Cill detail component and annotate.


These types of families take no longer than 5 minutes to build.

Where the power truly comes in… is nested, detail components within hosted profiles. The one we use like the trigger on an AK is slab edge profiles with nested detail components. Wherever you cut through the slab edge there’s the detail.


Now play around with levels of visibility…..course, medium and fine, and you can easily set up nested details to drill down from 1:50 to 1:5 without touching or adding anything to the component for the various scales. The Steel Angle and Bolt or tie you see in the image is set to display at fine (1:10 and bigger). From 1:20 upwards there is no angle or bolt.


Over the course of the next few weeks starting today I will be posting a host of detail families to Family of the Week be sure to check it out.

Wednesday, September 13, 2006

Populating Google Earth with BIM


How cool is this. I can now take my Revit model and "plonk" it on to the site in Google Earth.

I originally came across this on David Lights Blog - a Plug-in for Revit to Google Earth. Downloaded….installed….. and my clients are going nuts!!!! Man, this works!!!!!!

For those of you in SA if you have been on my Advanced concepts training with Cadplan, the whole exercise on specify coordinates truly comes into it,s own now. Those that haven’t been yet best you book at Cadplan.

I reckon if I stated to a client about three years ago that we will soon be interacting with the world map and CAD software….. they would have thought I was the one that was nuts

Thanks to the likes of Google, Avatech, and Autodesk Revit, the trends in BIM technology go way beyond….

Check out: Avatech for the plugin download.
Google for the Earth download

Tuesday, September 12, 2006

Paradigm Shift found!

While gaining momentum in total “Revit Blogshare Domination” (on Blogshares) I managed to stumble across a few new cool Revit blogs.

The one that really caught my attention was Paradigm Shift by Sean D Burke.
Some really great articles plus more links to even more great articles.
Fresh reading, Be sure to check it out!!!!!

Another, for the Portuguese tongue, check out Up to Work.
I couldn’t really judge on the content as I am a multi-lingual illiterate.

Wednesday, August 23, 2006

Revit Resources

If you are looking for the most comprehensive list of Revit Rescources on the Web, be sure to check out Cadplans Revit Resource Page.
If you would like your link added just drop Niki an email. Her address is found at the top of the page.

Thursday, August 10, 2006

"Failure to triangulate surface"

When working with a “Subregion” on site topography, I have often come up with the issue of "Failure to triangulate surface". Well it's not really an issue, other than Revit’s Sub-region tool’s inability to correctly indicate where the line join problem is.


The workaround I often use is to copy the sketch of the sub region. Then start a new floor sketch, and “Paste Aligned” the sketch lines. Finish sketch will then indicate where the joins or “intersecting lines don’t meet. Trim them up and “Copy” and “Paste Aligned” that back to the “Subregion” tool, Finish sketch and problem resolved.


Floor Sketch


Completed Sketch

Thursday, August 03, 2006

Beware of over-modeling

Lets face it, it is so cool to rebuild real life components as they really are. However there comes a time when you need to draw the line!

Take for example a stormwater mentis grid. It's very easy to setup a family with all sorts of array formulas to control the vertical and horizontal grids of the element. Just bare in mind that such a family is heavy and slow to manipulate. Now on a large project 20 of these spread around the site leads to bloat and large project files.(Fig1.)


One can simply achieve the same effect with a surface pattern. (Fig.2)


Both these families will be available for download on RFM shortly.

Within the next few weeks, I will also be posting a number profiles with nested detail components. These are such cool families to learn how to do, especially for those of you who want to seriously start crossing over to full construction documentation done inside Revit. Take Time in setting up your details or detail components, then, simply nest them into a profile Family. In the Project wherever you cut thru' the profile the detail will be visible in section. By assigning various levels of detail to the detail components, allows you to see what you need at the various scales.
The simple example below is a slab edge detail we often use.

Thursday, July 27, 2006

Family of the Week update.

Just a reminder that I have updated the Variable Shopfront Window for those who have requested so.
It now works out the array of the mullions properly to equal center lines, so that all panels are equal. It also allows for one center mullion or two equal panels now.

Available for download.
Thanks to those of you who did remark on it's pitfalls.

Thursday, July 20, 2006

“His empire is solid. He's created a template that others can follow.” - David Wolfe

I am busy Implementing Revit at my third site now. I chose this architectural firm because of the challenges it presented, in terms of the lack of Revit skills as well as the various fields or sectors of design and construction they specialize in.

The office consists of 11 CAD users, with only 2 that have been on Revit fundamentals training (over two years ago). Neither of them had used any of those skills to attempt a project in Revit. I have been here for 2 months now (plus two weeks needs assessment), and have got through setting up and educating 4 of the users.

The projects are starting to role out comfortably along with the projected timeline of the project schedules of construction. All four projects are in Construction documentation phases and are currently busy with earth works with construction to start shortly.

Based on the last two implementations I opted for a new strategy on this one.
I attribute the ease of how the users took to this transition on the following facts.

Revit Implementation.

Preparation.
Instead of jumping right in and getting started, I chose to spend two weeks in their office (getting paid of course). I was to prepare the following:

Team Selection.
Take time to get to know the staff. Fine tune your selection for a team that would be willing to take the leap. Look out for things like enthusiasm, attitude, practical and logical skills and rational. Age should also be part of the criteria. Young guns seem to catch on to this software as if it were Sims. It’s like playing a PC game or building those intricate custom Doom Levels as they have done till early hours of the morning.

The first team should be no larger than three people if you are the only implementation specialist. It becomes a logistical mess if bigger.
By getting 2-3 willing people with the right attitude and skills on board, then getting it all to work, causes great excitement in the office.
This starts generating a vibe in the office that the not so enthusiastic pick up. People hate feeling left out! I call them the “Let me see” lurkers. Although skeptical, they start lurking, over your shoulder with the “Let me see” or “show me, show me” command constantly being released from their traps.

They then become easy picking for the next round of training.

So pick the team that will give you the best vibe!

Project Startup.
Besides getting acquainted with the staff, take on a project during these two weeks that is current and busy with construction. This is done for two reasons.
One, familiarize yourself with all their office standards and apply those to families as well as a template that constantly, gets updated.

Secondly use it as an indication or the setting up of a bench mark. This builds the confidence of the decision makers that “Yes” this can be done in Revit, and “Wow” fairly quickly at that.
Once again this generates excitement. By applying a few added features such as 3D perspectives and slices (scope box 3d views) printed in colour with shadows to take to the meetings, really puts the cherry on the cake. Project architect walks into the meeting with “hey check what we can do now”.

Alignment.
Get the buy in from the right people. Align yourself with not only the Architects but with the whole professional team. It only takes two or three meetings to do so. Show off with the database to the QS and client. Brag with the topography tools, cut and fill schedules with the civil engineers, etc.
The trick is to put everyone at ease, that although the firm is changing their technology, the advantages that come with it are massive.
The important thing to remember here is, to build the confidence in the ability of ease of collaboration and file transfer across the various disciplines.

Office Standards.
One of the most important things to get right is the look and feel of Revit’s output or hard copies. Set up all their office standards, from the north point to the section arrow head, from the line weights to the fill patterns. What you want to achieve here is that they can’t tell the difference between their current CAD output and the ones from Revit. This will put an end to the “you can see this is printed from Revit”.
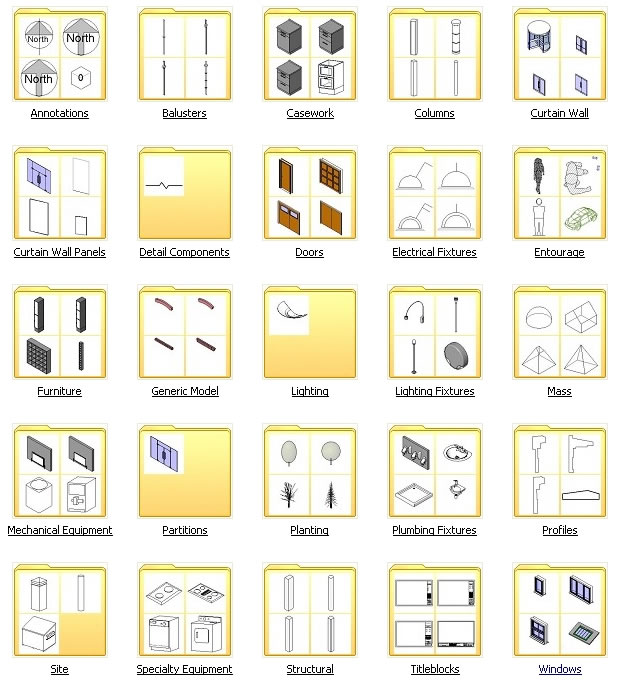
The all important Template.
This is THE KEY to your success. Over the two week period or preparation period really invest the time in building the most comprehensive Office Revit Template. This will include what I term as the “Family Starter Kits”. Take the time to setup and build a large majority of their local standard building components. Build “Smart Families”. Include documentation with these smart families to explain all the parameters that affect it. You will find a common design theme in a firm, use these themes to your benefit to build these smart families.
Rebuild all their standard detail symbols. Annotation symbols and so forth.
Set up all the system family standards. Wall styles, floor styles, roof styles etc.

Document the template comprehensively and provide your client with this document.

The reason for all this is simple. It’s easier to get started with something new if there is an element of familiarity to it all. By presenting a template and a document, that the user can refer too and is fairly comfortable with, eliminates a part of the learning curve, thus making your job easier. This allows the user to actually “get on with it” and concentrate on the necessary modeling tools, without having to worry about how to make that wall thicker.

This completes the needs assessment or preperation phase.

Training and implementation

Holding hands.
Custom Family building for your client vs. training the users on “How Too” is very much on the fence. This is entirely up to how you want to involve yourself. One has to weigh up the pros and cons. it's a case of, do whatever it takes to keep your client (and pocket) happy.
For me, it all depends on the project and project roll out.
If it is a fast track project you are only going to send the new user to levels of frustration he/she has never experienced. Don’t throw them in the deep end with confusing the issue further by adding Family components to the already smoldering pot. Rather hold their hand and build the families for them. When time is on your side teach the user how to build the family you just did.

The Project.
Choose the right project. Don’t go big!
Select a project type with known figures. This way one can compute, gauge or measure up on existing time lines.

Documentation Discipline.

1st rule for the user – Stick to what you need with what you know!
Yes the 3d view is so cool hey. Well it doesn’t help; it will just suck up all your valuable time!
To keep up with the project time line stick to the documentation list that is required.
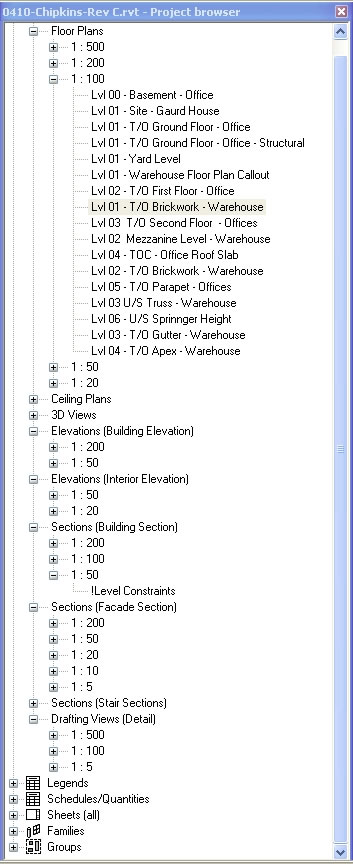
For example – for municipal submission one needs plans, sections, elevations at 1:100. Well!! Do those then!
Stop the user getting caught up in all the rubbish. Concentrate on the 2d documentation that is required. Don’t let the user get concerned with the fact that the window he is trying to put in, is not an Anderson casement blah, blah, blah, just use a window, any window as long as it looks sort of the same. Users tend to get into a panic if the manufacturers name is not part of the label.
They tend to get to specific to early. Remind them that this is a database, as long as a component is there representing the item we can always alter it easily at the correct time in the project. Now is not the correct time.
Until the user is proficient at Revit force them to stick to the documentation required. Only when the user becomes the expert will time be on their side to explore further intricacies in construction documentation.

Avoid over documenting.
Revit produces drawings so easily, it can lure a firm into over documenting a project. You need to establish a standard office guideline to which project documentation should adhere too. There are the added issues like project fee structures. Does one sacrifice profit for standards that are possibly set too high. Do you alter the standards, based on the project brief. The design and drafting team ultimately, has to be informed of the level of detail to which the project has to comply with. You should possibly set up various levels as guidelines based on this.

Summary:
1. Preperation - Compiling the Office Standards and Template
2. Getting the Buy-In and building the confidence.
3. Team selection, Project selection
4. Hand Holding
5. Discipline.


Next we will have a look at “Revit in Your Office” the work flow processes as well as team management.

Friday, June 30, 2006

New Family at RFM

I have been meaning to build this family for months. I finally got a break to do so.
For those of you that use sliding folding/stacking doors in your designs, this is the family for you.
Download it at RFM FOTW


Thursday, June 22, 2006

Corner Windows Resolved

My biggest issue with corner windows is that the families available, as well as the past families I have constructed, all act as one unit.
Being one unit, makes it increasingly difficult to schedule and place on legend views, thus forcing you to create extra elevation views of the component. The scheduling problem is as such, that if one of the sides differs in width, by our standards it should then become a new window type.

The simple solution to the problem is one needs to adjust the opening of the window family by half the wall width. You can possibly also leave yourself a parameter for adjusting that wall width.

1.In the family file of your chosen window set up some reference planes on the left or right hand side of the window which depicts the half of the wall width.
2.Select the opening of the window. This is often done easier in a 3D view.
3.On the options bar select the EDIT button. and re-align, edit and lock one of the sides to reference plans that were set up. This now creates a gap between the window and the wall opening, which allows the wall to cut further in the project file.

For a download of this file check out Family of the Week.


Tuesday, June 20, 2006

Family of the week is back!

Hi all!
I have to apologize for the brief delay in the uploads to Revit Family Man, Family of the week as well as this blog.
For the last month I have been implementing Revit at a remote site with variable if any internet connectivity. To upload a 1mb file was just ludicrous in terms of time taken to do so.
However, the latest Family of the Week is now uploaded and will continue on a weekly basis!! Be sure to check it out.

Wednesday, May 24, 2006

Rooms and Volumes

Tagging double/triple or more volume space is now a breeze in Revit R9.

In Revit’s gone by, the only way to annotate a double volume or more was to do it using the simple text tool. The room tag could be placed on the base level of the volume, but from there, any level above had to be annotated as apposed to tagged.

With R9 and the new “Room” tool one can place the Room (with crosshairs) at the base level of the volume and then via its properties, set the parameters to the height extent or volume of the room.


In any associated level above, one now just has to add the Room Tag to pick up the name, number etc.


Just another cool added feature to Revit.

Friday, May 12, 2006

"Time is on my side, yes it is."

I have had a bit of time on my side. Family of the week has been updated somewhat over the last few days.
Be sure to check out the new downloads available! More on its way!

Thursday, May 11, 2006

New Family - Structural Timber Truss

I have been asked a number of times if I have a Parametric timber truss. Well after digging around in the very orderly filling system I have (thank goodness for X1 desktop search) I managed to pluck a standard truss out an' posted it too Family Of The Week


Ready for Download!

Friday, May 05, 2006

More 2-Pick Examples

I have uploaded some more 2-Pick families on Family of the Week, and will be doing so as the library grows. Feel free to download comment and rate the families.

This family type has also created a great thread at AUGI with some more examples and tutorials.

Please dont hesitate to use the Contacts on the contact page for further information or help.

Tuesday, May 02, 2006

New R9 Family

The sun screen two-pick family for Revit R9 is available for download at Family of the Week
I will be following up with more of these on a weekly basis. Enjoy!

Tuesday, April 25, 2006

Release 9 family Improvements.

The greatest improvement to Revit 9 families is the introduction of line based families. Awesome!!!

There are two new family templates added namely, Detail Component Line Based and Generic Model Line Based.

This now means by simply clicking from a point to a point, will set up the family along the length of the line between the new points.

This also works for the chain option, however the miter or joins don’t clean up.

The implications of these new families are massive. From a simple workstation or kitchen counter top layout to complicated sun screens with array formulas. WOW!!! I will post this example among others on family of the week shortly.


Generic Model Line Based family with Array formula.


In the project select Component and click from a point to a point.


Bruce Gow - AKA - Beegee gives a quick tutorial on his blog Revitalize on how to setup a line based casework family. Be sure to check it out!

Wednesday, April 12, 2006

The "Lurking Beast" in Revit.

As stated before, Revit is by far the easiest architectural software I have yet crossed paths with. However, there is a beast lurking in this software one needs to be aware of!
The simplicity of creating simple small projects speaks for it self. Where do I go from there?
Large projects in a medium to large office brings on a whole new dynamic, along with a hidden user interface and capabilities, you don’t actually know exists or how to use.

If you are currently considering implementing BIM in your medium to large office and attempting to do it without the assistance of a Revit consultant, have you asked yourself the following questions?

Do you have?
The willingness to accept change?
A proven implementation plan as a guide?
The time to spend on the process?
Methods or a best practice guide set up for any given project?
Any planning or strategies needed for the project?
An understanding of over modeling, and the time constraint that should be adhered to?
A grasp of what a Revit team should consist of?
Any collaboration software techniques to assist in large file transfer and the tracking thereof?
Knowledge on the hardware requirements and limitations for Revit.

Do you know how to,
Complete a Revit project including all the construction documentation, schedules, legends and database analysis?
Setup the correct Revit Team and who the team should comprise of?
Manage and assign the correct tasks to the allocated team members?
Manage and work extensively with central files?
Effectively manage, store and interrogate the central and users, workset backups, log files and journal files?
Confidently use the Family Editor?
Manage the Family library and all its content?
Subcategorize your family components effectively.
Make the ODBC database work for you and your consultants.
How to use phasing and design options correctly.
Manage the time constraints of modeling families.
The list goes on....

You have to ask yourself “How much do I really know about Autodesk Revit.”
See the – The necessity of BIM implementation Strategy.

The necessity of a BIM implementation strategy

My contract as a Revit/Architectural consultant to A3 Architects has come to an abrupt end.
Over the past 12 months I have been assisting A3 Architects – Inc in achieving their full BIM status.
The task of changing over to BIM was completed so successfully that they literally have no further need for my full time services.

After spending three years in the Autodesk reseller channel and then applying the knowledge I had of Revit, into the actual work place has been an invaluable learning experience, “Priceless”. With a number of large successfully completed Revit projects, using only Revit for all documentation, I can honestly state that in the 15 years of being in the built industry, everything else I have used, researched and tested, fails in comparison.

With all that is happening around us in terms of other firms now trying to catch up with the BIM movement, I only have this to say.
Without the correct implementation strategy your cause is lost. If you are serious about making the switch in a cost effective and timely manner, it is essential that you seek the help of a qualified Revit Consultant to assist.

Due to the ever increasing need to achieve BIM status and the complete use and advantages thereof, as well as truly see the ROI in the software a new breed of consultants has recently evolved.

The necessity of BIM implementation strategy-cont.

Continued...
A number of articles define these necessary strategies.

Ensure Success in Your Transition to BIM - Author Rick Rundell-AIA
“Implementation Strategy for BIMA formal implementation strategy is an essential component of any successful BIM deployment and must go well beyond a simple training and rollout schedule. It should address head-on the work-flow and organizational changes inherent to BIM.”

Implementation in Practice (PDF)– Author Lachmi Khemlani, Ph.D View as HTML
"Implementing Revit effectively requires profound changes in the way architects work at almost every level within design. Most firms in the research study have found that Revit implementation not only requires learning a new application, but also requires learning how to reinvent the work flow, how to staff and assign responsibilities, and what to model and what not to.”

Beware the beast that is lurking!!!

Friday, March 24, 2006

Get rid of the Baggage!

Revit Family Man has been revamped and is now far quicker.
We are slowly upgrading as we go. Be sure to refresh your browsers.


A new Family of the week has also been added for download!

Be sure to check it out!

Enjoy!

Wednesday, March 15, 2006

Family of the week!

Revit Family Man has now got a "Family Of the week"

We will be posting some really cool families here, along with images. All parameters used, will be supplied with a detailed description.

Feel free to download them, vote on them, leave comments and if you like your details.

To get the concept going, we possibly will post a whole lot, so be sure to keep a watchful eye.

There is a collection of over 3gigs, (not all cool families), but we expect to get a whole lot up there.

Enjoy!

Friday, March 10, 2006

Go Big...or go home!

Revit Family Man is going BIG!!

Besides a number of other pressing opportunities, I am beginning to find that the hosting of this Blog at blogspot is rather limiting and frustrating. The upload times are just massive.

I have so much that I could share (family downloads, images, tutorials, help etc) and no where to put it all. So we went BIG and registered the domain name www.revitfamilyman.com and signed up for some seriously PHAT server space.


Please note: For now this will not affect this Blogs URL until the site is complete and we do the move across.
Thanks to all those that do read this Blog for all the support. In such a short period we have had over 5000 hits, with an average of over 55 per day.

The infant site is alive and waiting to grow. I Had to do a crash course in web and FTP publishing so don’t knock the programmer if things don’t work properly yet.
Although still in its infancy, you are more than welcome to go check it out. Over the next few weeks we will be completing all the services, so be sure to keep a lookout.

Mr Sun ... Shine your light on me.

I bet you have tried to print a shaded view of lets say floor layouts/patterns, and struggled endlessly with trying to match the pantone colours. It just doesn't come together.
When turning to "shaded with edges", Revit (and most 3D apps) makes use of default sun light that shines down on your model, giving it a slight edge and depth. (Mr. Sun, Mr. Golden Sun, shine your light on me….jingle…..daughter + Barney all day long)

To get an accurate portrayal of the real pantone colour rather select a solid surface pattern for your material. The surface pattern will show in a normal hidden line view.
In the views you don’t require the surface colour to be visible for floors, switch it off in visibility graphics.

Tuesday, March 07, 2006

Subcategorize

More often than not, the visibility issues you are experiencing in your project are closely related to the fact that your family components are not properly categorized.

Both model objects and lines make use of “Object styles”, which is setup by default as a subcategory of the family category in every family template.

This means, the elements of any family can be broken down into layers as you would be more familiar with. E.g.: A Door Family is broken into Panel, Glass, Opening, Frame/Mullion etc. You can customize these defaults as well as add your own line styles. One I like to add in a door family is “Lintols Over” and assign it a dashed line type.

Assigning object styles subcategories, enables the control of visibility of certain elements in the project via the Visibility Graphics tool. For example, for large scales one can simply switch door panels and frames off. In a smaller scale just switch them on again. There are always instances where the visibility of objects need to differ from view to view.

Family templates such as doors and windows have a number of these subcategories set up by default. When it comes to the likes of specialty equipment, Mechanical equipment, Generic model family templates, the need to create subcategories to control visibility graphics, is far greater. You will find only one subcategory to these templates.

Picture this scenario. You have a number of Mechanical families in a project. One of them being Aircon’ units. You have to supply the contractor a plan of just A/C layout details. If you switch Mechanical Equipment off in the view, all ME is turned off including your A/C. The reason is the A/C family components are not placed into subcategories.

Subcategories can be set up in the project, however these custom subcategories cannot be assigned to a family component whilst in the project.
In order for the visibility of subcategories to work the subcategories have to be created in the family using the family editor.

Monday, February 27, 2006

Revit Blog Community

With special thanks to the Revit Blog hound dog,
Steve Stafford has sniffed out yet another, Revit Beginners.
Welcome to the community David.

Thursday, February 16, 2006

Families vs. System tools

Building families is not always the only manner in which to assemble building components. In some cases one can achieve the same results using the tools provided.
Take the sunscreen for example (image). This could easily have been done using the structural tools, namely, Beams and Beam systems, once grouped, this whole element can then be copied all around the building.
So, I suppose, don’t always jump in head first, sit back and assess which method would be more efficient and less time consuming.
There are all sorts of factors that play a role in making such decisions. For quick design roll-out we just did these as beams and beam systems. For documentation purposes we rebuilt them as families as we needed to schedule the component as a whole.

We apply the same methodology to many other components such as windows. For quick designs, we use embedded curtain walls or just generic instance windows, that one can just pull to size. For construction documentation (CDs), we then rebuild them all into window families.
You might ask why do the work twice? Well it all has to do with time constraints in the design process, then scheduling and the ability to place these components as legend components in neat & tidy views in the CDs.

See this post for an example of legend views


Family Starter Kits

Before we get stuck into creating complex advanced families, there are a few tips and tricks I would like to start with.
The first example of such a tip/trick, I would term as “Family Starter Kits”.
A Family Starter Kit is a collection or library of common components, that you would end up using on a daily basis to construct families. As I hate to constantly do repetitive tasks, I adopted this methodology to eliminate such mundane time suckers.
For starters, elements such as profiles, can be loaded into a family and used with the Solid Sweep without having to create the profile every time. These Profiles are of course, parametric, which enables you to alter its state for the specific sweep required in the family.
Parallelograms and circular profiles are just some of the helpful profiles I have stored in my “family starter kit”


Family Starter Kits - cont 1

I then have some standard horizontal and vertical solid Bars” which make use of these standard profiles. The profiles are assigned parameters in the bars family types so with one change to the radius, (in the case of the parallelogram the sides length) updates the profile, which in turn updates the bar. Yes you can set this setup in the sketch, but it’s just easier and quicker this way.


Family Starter Kits - cont.

Unfortunately Revit doesn’t allow nesting the Profile in a label parameter which would allow you to change from the circle profile to a square profile. Hopefully this will come with time.
I can now simply load these families (I think of them as assembly parts), align them to reference planes, and presto I have a new Door Family very quickly.

Door Assembly


Complete Door


Now, by using this method one can drastically reduce the time required to build families. This following screen door is an example of that. Completed in less than 15 minutes.

Tuesday, February 07, 2006

One Size Fits All

Over the next few weeks I will attempt to show you the ease in creating multiple types in one family.

I tend to build one family with many uses and types. With the great tools Revit provides in families, it’s easy to make many types from just one model. With the clever use of array formulas, visibility formulas, nested families and labels, on can create many types, even if they differ slightly, from each other, with ease

The images below are a simple example of these features and all exist in one family.


Wednesday, January 25, 2006

I'm back!!!!

I have now completed my much needed 4 week vacation.
I have to say that I am not particularly pleased to be back after spending so much time in such a remote, quite, backward, rural place.

Note to self: look into that whole farming concept.

Man, we caught a tan, plenty of waves, stacks of fish, (and hangovers), oh how delightful life could be.

But, back to the slog or is that smog.
I am quietly working (under the radar) on a few very exiting things to do with Revit.
As we progress, so I will update the goings on, to this Blog.

Just give me a few days to wipe the beach sand from my teary eye's, and allow me to try get back into the swing of things.
I have so many emails and voice mails that its going to take days to go through it all. I am busy contemplating just deleting the whole lot. My view is, if its important they will send more.
Oh, all this technology. I never missed it one byte.
Sometimes I long for the days when all we had was just the office line.
Soon we are going to need A4 size business cards. Think about it!

Tel: Work, Home, Cell, Voice over IP No.
Fax No.
Email address Work, Personal.
Blog URL
Web Page URL.
Physical Address
Postal Address
Whatever is still to come?