Wednesday, November 30, 2005

Horizontal View Titles

When you alter the view rotation on a sheet to 90deg Clockwise or alternatively 90deg counterclockwise, inevitably the view title rotates with it.
By creating two new view title families you can eliminate the problem.

1. Open the existing view title family or alternatively your customized view title family.
2. Select what you need and first rotate it 90deg.
3. Reposition if necessary
4. Save this as the 90deg file.


5. Create another view title in the same manner, but this time rotate the necessary text -90deg.
Before doing so select the text that is going to be rotated and uncheck the “Keep Readable” parameter.
6. Save this as the -90deg file.


7. Now load these new families into your project.
8. Go to a sheet view and select a view that is rotated.
9. Select the properties of the view title, then Edit/New. Now select Duplicate.
10. Type in a new name and OK
11. In the “Title” Parameter change the value to your new family 90deg or -90deg depending on the rotation of the view
12. Apply, OK and you should have a 0 deg or straight view title.


Friday, November 25, 2005

Revit Gaining Momentum!

Not only is Revit gaining momentum in the Architectural Industry but in blogs as well.
Bruce Gow, (or Beegee to most, from ZOOG days and now AUGI), has started his own….. Revitalize. I am sure with all his experience and knowledge, will add yet another informative Blog on Revit.
Be sure to check it out.

Tuesday, November 15, 2005

Current Project

here are some images from a current project.


Perspective Views


Joinery/Casework Details and schedules


Detail Sections


Handrail Details


Aluminium Shopfront/window schedule


This is one of the smaller hospitals I am involved with. Three Stories, plus basement parking. This was a new 10 000 sqm addition to an existing 20 000sqm hospital. We built the entire existing building in Revit, phased it and added the new work. The above images reflect the level of detail and documentation we go too, all done in Revit!!
No external or 3rd party apps used to achieve the end result or construction documentation. No Lines are used, detail or otherwise. The whole project consists of families. The less rubbish we put in the smaller the file size.

We decided to totally Revitize this project. No DWG links, no DWG whatsoever!!! No unnecessary “BLOAT” added to the project. The result was extremely surprising. The benefits and results found in doing a complete Revit project are astounding. If you want to keep it simple, and keep it small, the solution is in building and loading families!

The building is probably 60% built. I will post photos as we go.

Reference goodies continued

Reference Lines
Reference lines were introduced from Release 7 of Revit. Its purpose being, to set up angle parameters. Reference lines together with an angular dimension parameter, control any geometry attached to the angular reference. For example, the web of a truss. Reference lines also provide two planes, one parallel to the plane the other perpendicular to the reference plane. Although reference lines cannot be named, one can use these two planes to create a Work Plane from.


After selecting the Work Plane tool, select “Pick a plane”, in the Work Plane dialogue box. By using the Tab Key, filter through the selection of the two which you would like to set as current.

Monday, November 14, 2005

Understanding Reference Planes and Work Planes

When I asked student’s “What was the most difficult part of Revit to understand” the answer nine out of ten was “Reference Planes vs Work Planes”. To further continue building families we first need to understand a bit of Revit’s terminologies, i.e. Reference Planes, Reference Lines and Work Planes.

Reference Planes, and the Family Editor.
In the Family Editor, “Reference Planes” are the KEY to successful families! Reference Planes have no end. Reference planes are in effect, “Construction lines” or guide lines to aid in your parametric design. Once dimensions are added between the Reference planes, unique parameters such as, Height, Width or Length can be assigned to the dimensions. These parameters now allow you to “Stretch Your Model”. There is no stretch command in Revit, and this becomes your means of stretching, by altering the parameter. Now a Parametric Model.

Before any geometry is built in a family it is advisable to, first set out the Reference planes then the dimensions and lastly the solid geometry. Any geometry built on reference planes are automatically locked to their parameters.

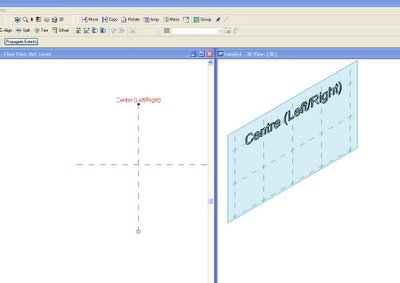
Most, if not all of the family templates (*.rft) which Revit provides, have some sort of “startup kit”, ready to use, and are laid out as a guide, for you to further improve on the parameters. Every one of them have a cross of reference planes in the plan view, the intersection of which, defines the origin or “insertion point”. This Origin can be altered by simply changing the properties of the reference plane.

Reference Planes vs. Work planes.

In the Family Editor more than in the project, you will need to deal with both Reference planes as well as Work Planes.
This is where it gets most people confused.
Most views in Revit have an automatic Work Plane. Remember you are not only constructing in the X and Y axis but as well as the Z.

Simple enough?
It is actually. Once a reference plane is named it becomes a Work Plane. To name a Reference plane, simply add a unique name in the Name Field under its properties.

Revit will by default automatically assign a Work Plane for the specific view you are in. For example in the level 1 floor plan, automatically the Work Plane is at Level 1. When using the Family editor all plan views are set to Reference Level. By default the Work Plane is automatically the Ref. Level. At any point you can define which plane to work on and check if it’s the correct one by firstly using the Work Plane Icon (1) and setting the correct work plane.


Secondly, selecting the Work Plane Visibility Icon (2), will give a clear indication as to which Work Plane is set as current.


Wednesday, November 09, 2005

"Revitize" Legacy Data

All your life work and collection of suitable CAD symbols that make your documents unique need not be wasted. “How do we Transfer our Legacy Data into Revit” Is a question I had in every training course I have given.

Not all Revit content or Families, have to be fully Parametric! We took the stand or view, that certain components unique to our block library need not be. For example, all the Plumbing fixtures such as WC’s, Urinals, Basins, Sinks and Baths, were taken straight from the Manufactures DWG library. We Load and place the exact component as per the manufacturers catalogue. Most Components that we have accumulated over the years have got plan, side and front views, and from these we build up multi-view components.

Before starting with importing the DWG’s it is advisable to clean them up and ensure that all lines in the DWG are on layer Zero. That way there is less to clean up in Revit, as all layer properties are transferred with the Dwg. This creates a lot of extra subcategories in the Object Styles that complicate matters when cleaning up the Revit family.

The key to transforming from Dwg to Revit Family, is to make it Revit or to “Revitize” it. By this I mean, perform a “Full Explode” of the Dwg, and change Dwg lines to Revit lines, plus get rid of any hint of Dwg in the file. The cleaner it is, the more Revit like it becomes.

Alternatively you can trace over the Dwg using Revit’s tools and delete the Dwg afterwards.
The simple trick is, is not to leave any remains of the Dwg behind. This just adds “BULK” to the Project. By doing a quick check on the Subcategories in the Object Styles, one can immediately tell if you didn’t clean your DWG to start with.You can delete the “Layers” from the Object Styles and any lines that were on those layers will change to the Default Family Category.

Do not create a Family by using the imported symbol and leaving it there. Revitize it and get rid of the DWG! It will come back and bite you on the ....at a later stage.

The objective here is to eventually move away from dwg entirely. I have been dwg free for a year now!!!
It’s all Revit or Bust!


Tuesday, November 01, 2005

RSS Feed Added

Just added RSS Feed with feedburner. Click on the Feedburner icon in the sidebar for more info!