Friday, June 30, 2006

New Family at RFM

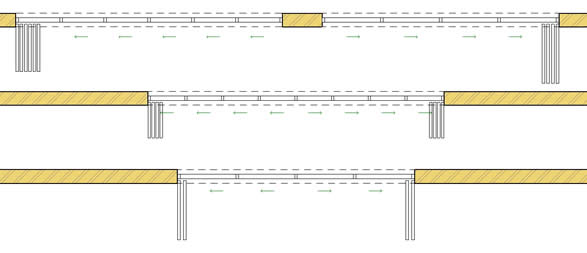
I have been meaning to build this family for months. I finally got a break to do so.
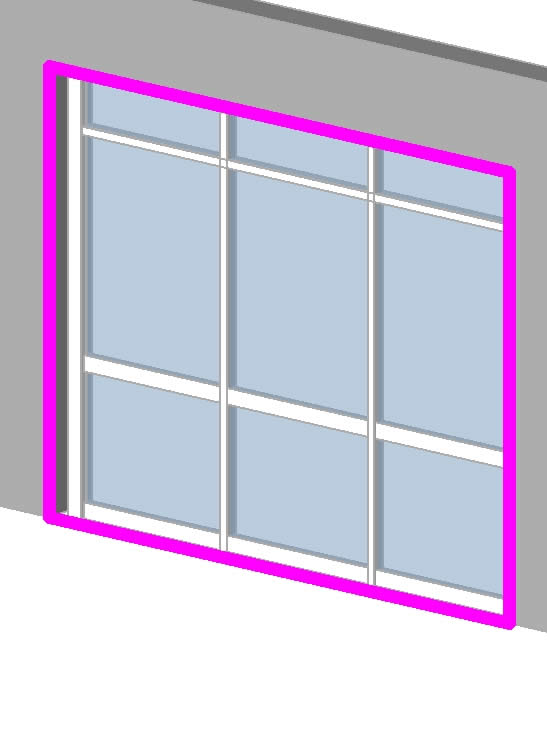
For those of you that use sliding folding/stacking doors in your designs, this is the family for you.
Download it at RFM FOTW
Thursday, June 22, 2006

Corner Windows Resolved

My biggest issue with corner windows is that the families available, as well as the past families I have constructed, all act as one unit.
Being one unit, makes it increasingly difficult to schedule and place on legend views, thus forcing you to create extra elevation views of the component. The scheduling problem is as such, that if one of the sides differs in width, by our standards it should then become a new window type.

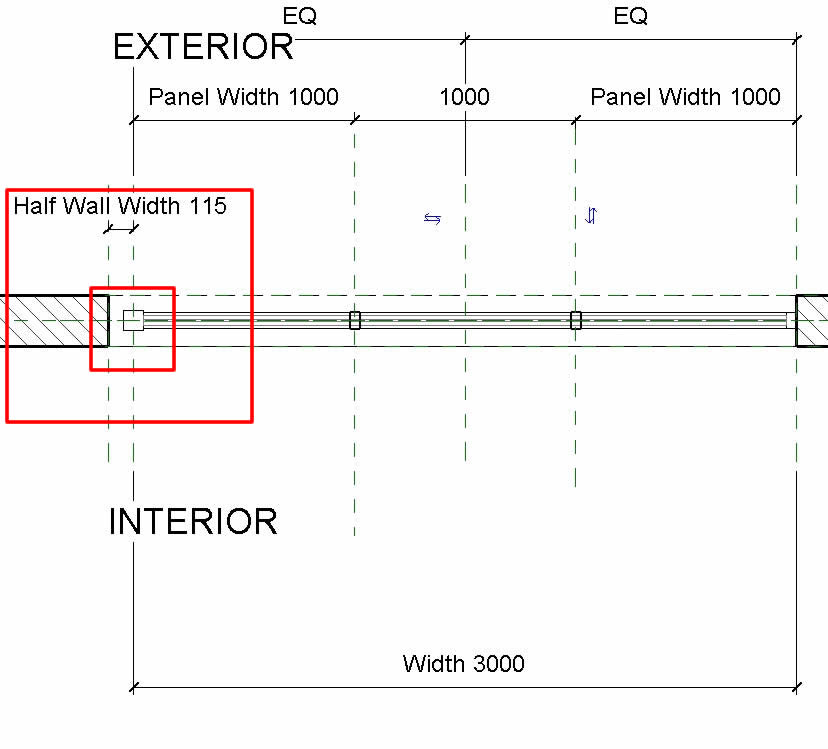
The simple solution to the problem is one needs to adjust the opening of the window family by half the wall width. You can possibly also leave yourself a parameter for adjusting that wall width.

1.In the family file of your chosen window set up some reference planes on the left or right hand side of the window which depicts the half of the wall width.
2.Select the opening of the window. This is often done easier in a 3D view.
3.On the options bar select the EDIT button. and re-align, edit and lock one of the sides to reference plans that were set up. This now creates a gap between the window and the wall opening, which allows the wall to cut further in the project file.

For a download of this file check out Family of the Week.


Tuesday, June 20, 2006

Family of the week is back!

Hi all!
I have to apologize for the brief delay in the uploads to Revit Family Man, Family of the week as well as this blog.
For the last month I have been implementing Revit at a remote site with variable if any internet connectivity. To upload a 1mb file was just ludicrous in terms of time taken to do so.
However, the latest Family of the Week is now uploaded and will continue on a weekly basis!! Be sure to check it out.

Wednesday, May 24, 2006

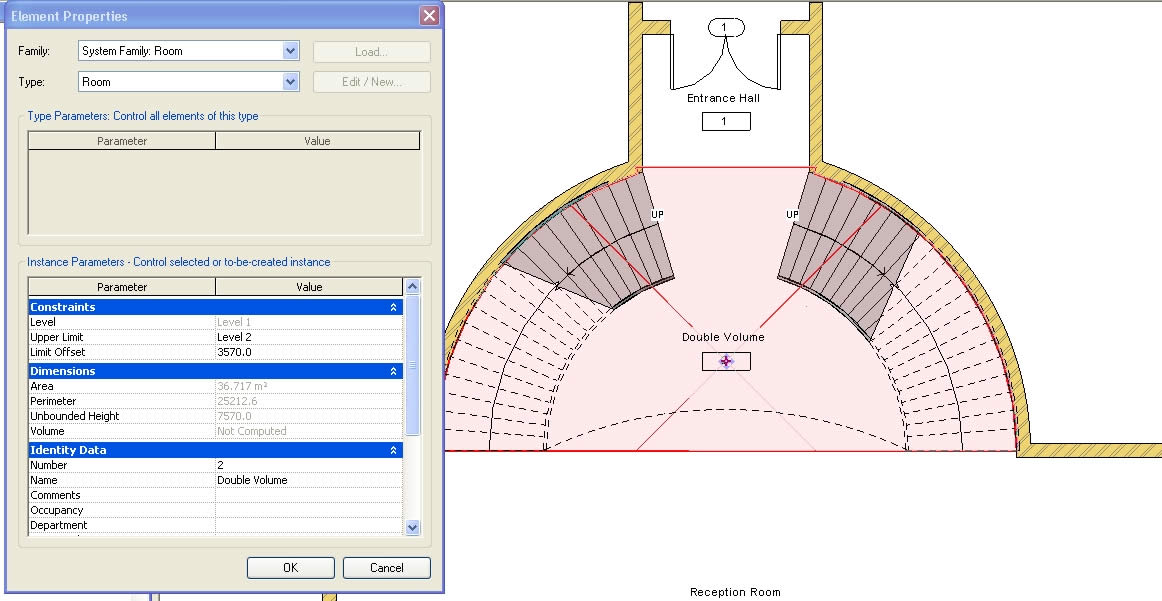
Rooms and Volumes

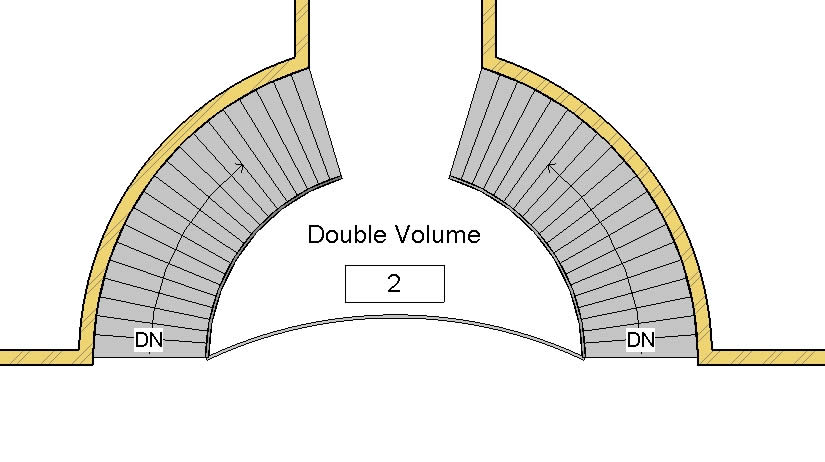
Tagging double/triple or more volume space is now a breeze in Revit R9.

In Revit’s gone by, the only way to annotate a double volume or more was to do it using the simple text tool. The room tag could be placed on the base level of the volume, but from there, any level above had to be annotated as apposed to tagged.

With R9 and the new “Room” tool one can place the Room (with crosshairs) at the base level of the volume and then via its properties, set the parameters to the height extent or volume of the room.


In any associated level above, one now just has to add the Room Tag to pick up the name, number etc.


Just another cool added feature to Revit.

Friday, May 12, 2006

"Time is on my side, yes it is."

I have had a bit of time on my side. Family of the week has been updated somewhat over the last few days.
Be sure to check out the new downloads available! More on its way!

Thursday, May 11, 2006

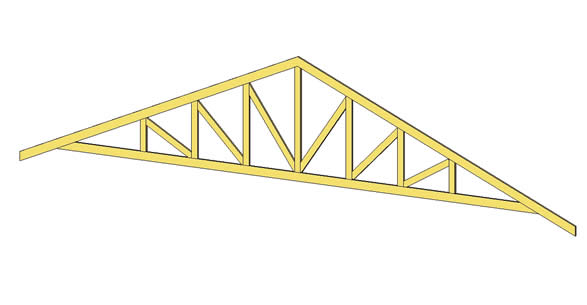
New Family - Structural Timber Truss

I have been asked a number of times if I have a Parametric timber truss. Well after digging around in the very orderly filling system I have (thank goodness for X1 desktop search) I managed to pluck a standard truss out an' posted it too Family Of The Week


Ready for Download!

Friday, May 05, 2006

More 2-Pick Examples

I have uploaded some more 2-Pick families on Family of the Week, and will be doing so as the library grows. Feel free to download comment and rate the families.

This family type has also created a great thread at AUGI with some more examples and tutorials.

Please dont hesitate to use the Contacts on the contact page for further information or help.

Tuesday, May 02, 2006

New R9 Family

The sun screen two-pick family for Revit R9 is available for download at Family of the Week
I will be following up with more of these on a weekly basis. Enjoy!

Tuesday, April 25, 2006

Release 9 family Improvements.

The greatest improvement to Revit 9 families is the introduction of line based families. Awesome!!!

There are two new family templates added namely, Detail Component Line Based and Generic Model Line Based.

This now means by simply clicking from a point to a point, will set up the family along the length of the line between the new points.

This also works for the chain option, however the miter or joins don’t clean up.

The implications of these new families are massive. From a simple workstation or kitchen counter top layout to complicated sun screens with array formulas. WOW!!! I will post this example among others on family of the week shortly.


Generic Model Line Based family with Array formula.


In the project select Component and click from a point to a point.


Bruce Gow - AKA - Beegee gives a quick tutorial on his blog Revitalize on how to setup a line based casework family. Be sure to check it out!

Wednesday, April 12, 2006

The "Lurking Beast" in Revit.

As stated before, Revit is by far the easiest architectural software I have yet crossed paths with. However, there is a beast lurking in this software one needs to be aware of!
The simplicity of creating simple small projects speaks for it self. Where do I go from there?
Large projects in a medium to large office brings on a whole new dynamic, along with a hidden user interface and capabilities, you don’t actually know exists or how to use.

If you are currently considering implementing BIM in your medium to large office and attempting to do it without the assistance of a Revit consultant, have you asked yourself the following questions?

Do you have?
The willingness to accept change?
A proven implementation plan as a guide?
The time to spend on the process?
Methods or a best practice guide set up for any given project?
Any planning or strategies needed for the project?
An understanding of over modeling, and the time constraint that should be adhered to?
A grasp of what a Revit team should consist of?
Any collaboration software techniques to assist in large file transfer and the tracking thereof?
Knowledge on the hardware requirements and limitations for Revit.

Do you know how to,
Complete a Revit project including all the construction documentation, schedules, legends and database analysis?
Setup the correct Revit Team and who the team should comprise of?
Manage and assign the correct tasks to the allocated team members?
Manage and work extensively with central files?
Effectively manage, store and interrogate the central and users, workset backups, log files and journal files?
Confidently use the Family Editor?
Manage the Family library and all its content?
Subcategorize your family components effectively.
Make the ODBC database work for you and your consultants.
How to use phasing and design options correctly.
Manage the time constraints of modeling families.
The list goes on....

You have to ask yourself “How much do I really know about Autodesk Revit.”
See the – The necessity of BIM implementation Strategy.

The necessity of a BIM implementation strategy

My contract as a Revit/Architectural consultant to A3 Architects has come to an abrupt end.
Over the past 12 months I have been assisting A3 Architects – Inc in achieving their full BIM status.
The task of changing over to BIM was completed so successfully that they literally have no further need for my full time services.

After spending three years in the Autodesk reseller channel and then applying the knowledge I had of Revit, into the actual work place has been an invaluable learning experience, “Priceless”. With a number of large successfully completed Revit projects, using only Revit for all documentation, I can honestly state that in the 15 years of being in the built industry, everything else I have used, researched and tested, fails in comparison.

With all that is happening around us in terms of other firms now trying to catch up with the BIM movement, I only have this to say.
Without the correct implementation strategy your cause is lost. If you are serious about making the switch in a cost effective and timely manner, it is essential that you seek the help of a qualified Revit Consultant to assist.

Due to the ever increasing need to achieve BIM status and the complete use and advantages thereof, as well as truly see the ROI in the software a new breed of consultants has recently evolved.

The necessity of BIM implementation strategy-cont.

Continued...
A number of articles define these necessary strategies.

Ensure Success in Your Transition to BIM - Author Rick Rundell-AIA
“Implementation Strategy for BIMA formal implementation strategy is an essential component of any successful BIM deployment and must go well beyond a simple training and rollout schedule. It should address head-on the work-flow and organizational changes inherent to BIM.”

Implementation in Practice (PDF)– Author Lachmi Khemlani, Ph.D View as HTML
"Implementing Revit effectively requires profound changes in the way architects work at almost every level within design. Most firms in the research study have found that Revit implementation not only requires learning a new application, but also requires learning how to reinvent the work flow, how to staff and assign responsibilities, and what to model and what not to.”

Beware the beast that is lurking!!!

Friday, March 24, 2006

Get rid of the Baggage!

Revit Family Man has been revamped and is now far quicker.
We are slowly upgrading as we go. Be sure to refresh your browsers.


A new Family of the week has also been added for download!

Be sure to check it out!

Enjoy!

Wednesday, March 15, 2006

Family of the week!

Revit Family Man has now got a "Family Of the week"

We will be posting some really cool families here, along with images. All parameters used, will be supplied with a detailed description.

Feel free to download them, vote on them, leave comments and if you like your details.

To get the concept going, we possibly will post a whole lot, so be sure to keep a watchful eye.

There is a collection of over 3gigs, (not all cool families), but we expect to get a whole lot up there.

Enjoy!

Friday, March 10, 2006

Go Big...or go home!

Revit Family Man is going BIG!!

Besides a number of other pressing opportunities, I am beginning to find that the hosting of this Blog at blogspot is rather limiting and frustrating. The upload times are just massive.

I have so much that I could share (family downloads, images, tutorials, help etc) and no where to put it all. So we went BIG and registered the domain name www.revitfamilyman.com and signed up for some seriously PHAT server space.


Please note: For now this will not affect this Blogs URL until the site is complete and we do the move across.
Thanks to all those that do read this Blog for all the support. In such a short period we have had over 5000 hits, with an average of over 55 per day.

The infant site is alive and waiting to grow. I Had to do a crash course in web and FTP publishing so don’t knock the programmer if things don’t work properly yet.
Although still in its infancy, you are more than welcome to go check it out. Over the next few weeks we will be completing all the services, so be sure to keep a lookout.
Mr Sun ... Shine your light on me.

I bet you have tried to print a shaded view of lets say floor layouts/patterns, and struggled endlessly with trying to match the pantone colours. It just doesn't come together.
When turning to "shaded with edges", Revit (and most 3D apps) makes use of default sun light that shines down on your model, giving it a slight edge and depth. (Mr. Sun, Mr. Golden Sun, shine your light on me….jingle…..daughter + Barney all day long)

To get an accurate portrayal of the real pantone colour rather select a solid surface pattern for your material. The surface pattern will show in a normal hidden line view.
In the views you don’t require the surface colour to be visible for floors, switch it off in visibility graphics.

Tuesday, March 07, 2006

Subcategorize

More often than not, the visibility issues you are experiencing in your project are closely related to the fact that your family components are not properly categorized.

Both model objects and lines make use of “Object styles”, which is setup by default as a subcategory of the family category in every family template.

This means, the elements of any family can be broken down into layers as you would be more familiar with. E.g.: A Door Family is broken into Panel, Glass, Opening, Frame/Mullion etc. You can customize these defaults as well as add your own line styles. One I like to add in a door family is “Lintols Over” and assign it a dashed line type.

Assigning object styles subcategories, enables the control of visibility of certain elements in the project via the Visibility Graphics tool. For example, for large scales one can simply switch door panels and frames off. In a smaller scale just switch them on again. There are always instances where the visibility of objects need to differ from view to view.

Family templates such as doors and windows have a number of these subcategories set up by default. When it comes to the likes of specialty equipment, Mechanical equipment, Generic model family templates, the need to create subcategories to control visibility graphics, is far greater. You will find only one subcategory to these templates.

Picture this scenario. You have a number of Mechanical families in a project. One of them being Aircon’ units. You have to supply the contractor a plan of just A/C layout details. If you switch Mechanical Equipment off in the view, all ME is turned off including your A/C. The reason is the A/C family components are not placed into subcategories.

Subcategories can be set up in the project, however these custom subcategories cannot be assigned to a family component whilst in the project.
In order for the visibility of subcategories to work the subcategories have to be created in the family using the family editor.

Monday, February 27, 2006

Revit Blog Community

With special thanks to the Revit Blog hound dog,
Steve Stafford has sniffed out yet another, Revit Beginners.
Welcome to the community David.

Thursday, February 16, 2006

Families vs. System tools

Building families is not always the only manner in which to assemble building components. In some cases one can achieve the same results using the tools provided.
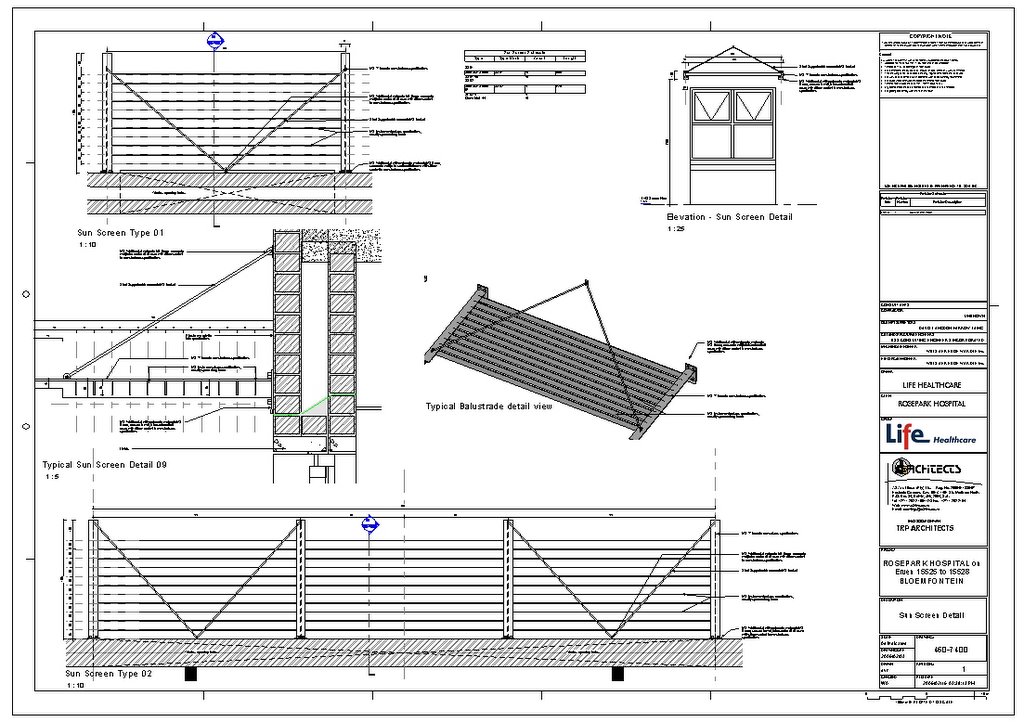
Take the sunscreen for example (image). This could easily have been done using the structural tools, namely, Beams and Beam systems, once grouped, this whole element can then be copied all around the building.
So, I suppose, don’t always jump in head first, sit back and assess which method would be more efficient and less time consuming.
There are all sorts of factors that play a role in making such decisions. For quick design roll-out we just did these as beams and beam systems. For documentation purposes we rebuilt them as families as we needed to schedule the component as a whole.

We apply the same methodology to many other components such as windows. For quick designs, we use embedded curtain walls or just generic instance windows, that one can just pull to size. For construction documentation (CDs), we then rebuild them all into window families.
You might ask why do the work twice? Well it all has to do with time constraints in the design process, then scheduling and the ability to place these components as legend components in neat & tidy views in the CDs.

See this post for an example of legend views


Family Starter Kits

Before we get stuck into creating complex advanced families, there are a few tips and tricks I would like to start with.
The first example of such a tip/trick, I would term as “Family Starter Kits”.
A Family Starter Kit is a collection or library of common components, that you would end up using on a daily basis to construct families. As I hate to constantly do repetitive tasks, I adopted this methodology to eliminate such mundane time suckers.
For starters, elements such as profiles, can be loaded into a family and used with the Solid Sweep without having to create the profile every time. These Profiles are of course, parametric, which enables you to alter its state for the specific sweep required in the family.
Parallelograms and circular profiles are just some of the helpful profiles I have stored in my “family starter kit”