The ability to build your own comes with lots of understanding and tons of practice.
By lack of content, I simply mean that for example a client wants a window that is fixed on one side and double top hung on the other. Simple enough.
Far too many users try re-invent the wheel, and build these things from scratch, why on earth..... when you already have the window designs in your library. All you have to do is piece them together.... it's called nesting.
Here is a simple exercise to learn how.
1. Start a new family using the Window.rft as the template of choice.
2. Goto the 3D view and select the opening cut in the wall and delete it.(if this does get a little tricky use the TAB key to cycle through the selection while the mouse is resting on the opening cut.)
3. Goto the Floor Plans; Ref Level view.( double click on ref level in the project browser.... dopey...NO! not the one under Ceiling Plans....Floor Plans).
4. File; Load from Library; Load Family! in your windows directory in your library we need to select two windows. Highlight the Double Hung.rfa then Ctrl key to add the Fixed.rfa, now click open. Depending on whether you have imperial or metric libraries, the prefix to the files will differ, ie. M_Double... or I_Double.......

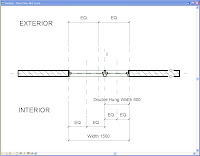
5.Set up a vertical Ref Plan around 600mm from the right side's Ref plan back towards the center. this is going to control the double hung's width. What ever is remaining is going to become our remainder width for the fixed window.

6. Dimension that width, select the dimension and add a label to it.
(right click, Edit Label select Add Parameter, or select the label function on the Options tool bar... slab bang in the top middle of your screen and select Add Parameter from the drop down list.
Name the label Double Hung Width, and group it under Dimensions

7. For the nested windows to work properly they need centerlines to align and grow from. Create Ref planes and EQ dimension as per the fig.

8. Select the component tool (Design bar on the left), in the type select, then choose the smaller double hung window 406 x 1200mm from the list and place it anywhere along the wall.

9. Align the window in plan to the center line Ref Plane we created and lock.

10. Now associate the windows parameters with the new families parameters. ie select the window and goto its properties, Select edit(top right of dia) select the little box along the end of the height parameter and equal it to height. Do the same for Default Cill Height. Make the width = to the new Double Hung Width we created.
 11. We now need to set up a remainder width parameter to associate the fixed window width too.
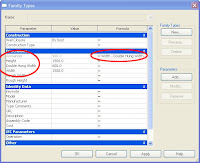
12. Select Family Types in the Design bar. Click Add Paramater, name the parameter Remainder, group it under Dimensions and make it a length Type Parameter.
 13. Add the following formula to the Remainder parameter... Width - Double Hung Width. Parameters are case sensitve.
14. Now Place the Fixed 406 x 1220mm window along the wall. Align and lock the window to the second center ref plane we created. Follow the same steps as in step 10 except for the width. Associate this windows width to the Remainder parameter.

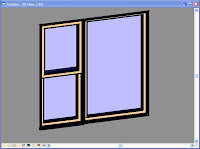
Right, simple hey! Your window should look like this.
15. Goto family types, "stretch your family" test all the parameters to see if it all works. (If it doesn't.... take this number down, 555 6352 -- it's the care bears hotline.)
Now set up new family types, load into projects and start using.
Nested families rock! In previous post I spoke of family starter kits, well... this is taking it to the next level. We have soooo many families and mostly combine all the parts to make one. Enjoy


2 comments:
in (9.) you mention putting the window on the reference plane and locking it. how do you lock the window on the middle reference plane?
logan,
simply align the ref plane to the center of the window. If you rest your mouse around the center of the window you will see a centre line highlight
Post a Comment