Thursday, August 28, 2008

Quantify Profiled Roof Sheeting

This comes up a bunch of times.
"How do I show roof sheeting properly with the profile and how can I schedule all the panels?"
"We do lots of warehouses and want to be able to schedule costs for roof as well as all the vertical paneling"

1. Draw up the profile using the profile Family template. Save it (*-Remember the file name)
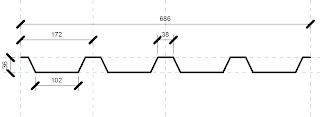


2. Start a new family using the Structural Framing - Beams and Braces.rft. Load the Profile into this. Delete the rectangular solid supplied in this template. Now draw a new solid using the sweep tool. Attach the profile you loaded (*Remember -as saved) and finish the sketch.
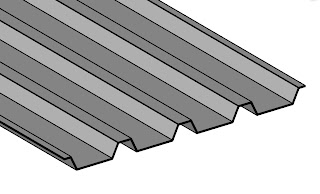


3. Save this family and load it into the project. Now using the beam system tool ( in the Structural Drawer) draw the outline of your roof. Remember to set up your work plane in section to be able to put this beam system down on in plan if your roof is at an angle. This also applies to vertical sheeting, set up work planes and draw the beam system from an elevation on that workplane.
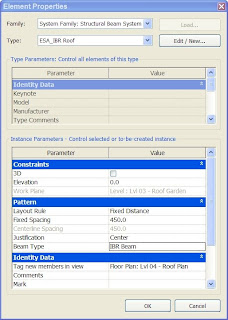


In the pattern group of parameters, set up the distance between and the beam type. (this is the beam you just loaded with the profile you just drew.) Finish the sketch.


Now do a structural framing schedule with filters to isolate just that type.
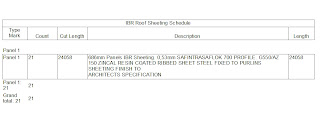


And Bob's your uncle.

Tuesday, March 25, 2008

Wall Closure

Ja, it's been awhile......

Here is one I get regularly!

"How do I get to control the distance or nature of the wall closure wrapping of the exterior wall finish at a door or window?"

Default scenario


Controlled scenario


It's easy! It's all in the Family!

Edit the Family that you are using as an insert. In this case I am using a door.

Using the "Ref Plane" tool draw a new reference plane along the inside of the wall


-This one here - away from the center ref plane


Select that new reference plane and go to its Element Properties. Tick or check the box parameter which is "Wall Closure"


This in effect, cancels the Revit default Wall closure along the center of the wall , and places the wall closure on the custom plane you just created. To be able to control the distance of that plane all you need to do is add a dimension and label it. In this example I selected to name that parameter "Closure"


1. Dimension from the new reference plane to the exterior reference plane (or Interior, which ever is your preference)
2. Select the dimension and on the Options Bar (Top Center of your Screen) next to "Label: click on the little drop down arrow and "Add parameter...."
3. Give it a name. (e.g. Closure) and remember to place it in the correct group (e.g. Dimensions)
4. Load your revised family into the project. (click on "Load Into Project" on the Design Bar)
Select the Family and from its properties you will now be able to control the Wall Closure via the "Closure Parameter.

Have fun!

I hope to get back into the swing of things and post more regularly. So watch this space!!