Friday, September 22, 2006

Browser Organization.

Few know, not only how to work with the browser organizer but also how to make it work effectively for you.

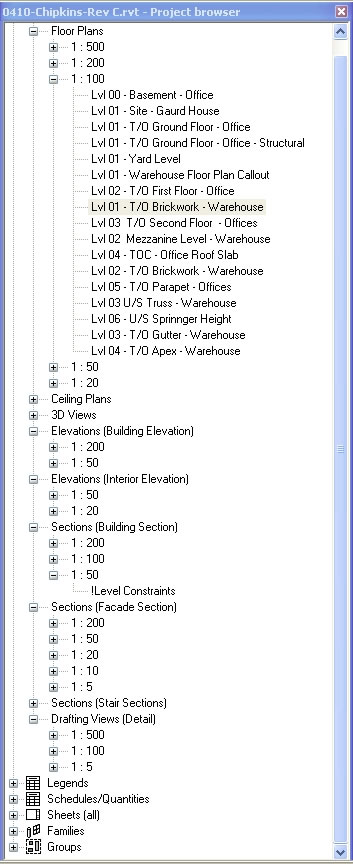
One of the biggest issues I have when auditing and dealing with clients f*/&^ing messy files is the lack of discipline applied when creating levels and the naming convention thereof. How on earth is anyone supposed to know what the heck “Level U/S SS RC-B” is supposed to be, and on top of that there are 3 of them with varying case sensitivity.

Now, I have had it happen a few times that a Revit user has left a firm, and we now have to clean the file up, so that it makes enough sense, for others to continue on. It’s like those frikkin layers in ACAD, if the standards are not adhered to then …….. MESS!!!!!!!!

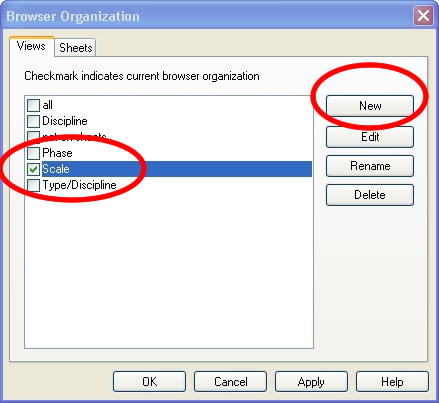
The Browser Organizer becomes our “Big mate” for a few hours. By sorting anf filtering options we can quickly determine what view was actually meant for what purpose

In big Projects, Browzer Organization is an absolute “No Brainer”. It allows you to effectively streamline the otherwise out of control and massive list of views that go with the territory.

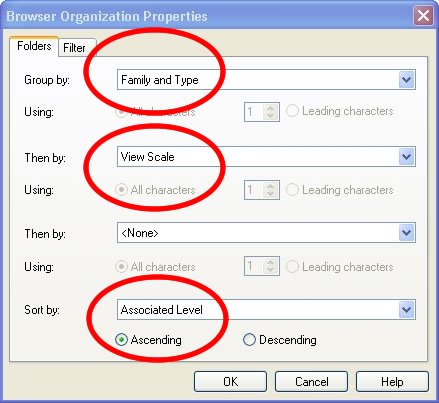
The method for Browzer Organization that I have found suites our offices the most effectively is by organizing the views by scale then by associated level. This allows us to work on the parts of the project that are required in that instance of the project time line.

The following illustrations define what I consider as the best manner in which to organize those views.


Wednesday, September 20, 2006

Family Editor Revisited

I have prepared a number of articles on the family editor mainly targeted for those just starting out, and for those just looking to pick up a few tips along the way. I will be posting a number of these articles over the next few weeks.

Do enjoy!!

Starting with.

Family Templates and Categories

There are three types of families in Revit.

1. System families which consist of
o Walls
o Floors
o Ramps
o Roofs
o Stairs
o Railings
o Ceilings

2. In-place Families
On the fly, project based custom families.

3. Model Families

New Revit families are started using a family template.
There are three types of family templates one can use to build and customize your library:

1. Annotation family templates
2. Title block family templates
3. Model Family templates

All have the extension or file type in Revit of *.rft , simply for Revit Family Template.

When starting a new model family, Revit by default, opens the model template directory, offering you the chance to select the correct template file for the correct category of the component.
Some of these family template catagories have more than one template file and these are known as host family templates.
These templates allow you to build families which host to system families.
Wall based; Floor based; Ceiling based, Face Based and Roof based family templates. Host families require the host element in the project file to attach to. This way one can add a wall based plumbing fixture to a wall in the project. When the wall moves the fixture moves with it, saving time when editing.

These templates are used for a number of reasons
1. Starting guides to set up the families.
2. Categorize the family component into building categories that Revit can understand in the database for reasons of scheduling.
3. For you to organize your library.

Revit provides a library of about 110mb of families all divided into directories of the categories.
Over the last 5 years I have increased my own to over 4gig’s of components, so organizing the library becomes a massive task. These directories are a guideline for you to further evolve the library.
e.g. Under Casework I have 4 more:
o Floor units
o Wall units
o Worktops
o Counters
o BIC’s

Categories
Model Families built in a specific category can be changed to another for various reasons and scheduling purposes.

Too change a family’s category.
1. Open the family save it as another.
2. Select Settings\Family Categories and Parameters……
3. Select the new category from the list and hit OK.
4. Load the family into your project.

List of Standard Library Catagories

Thursday, September 14, 2006

Detail Components Uploaded

I keep coming across people that are still modeling in Revit and detailing in CAD. Why oh why, would you want to do something so STUPID?

Revit has the massive ability to use both 3d elements and an overlay of 2d components. The process of detailing in Revit is actually so much easier than anything I have used in the past!!!!

Detail components are your biggest weapon to finally cross over to full 100% Construction Documentation done inside Revit.
Spend time in building your detail component library. Hey! it doesn’t take that much time either. You have got all the ammo, stored in your unintelligent software as blocks.

It’s a case of starting a new detail component family template and importing that CAD detail you need. Either, trace over it, or explode the CAD symbol, save it and overlay it back in your project.

KISS (keep it simple stupid) applies here. There is no necessity to go off on a tangent and spend 6 hours building a complicated 3D family to be able to detail it further when all you need for construction are 2d details.

Here is a simple example of a Window Cill detail. This is a block I have had in CAD for Years. Now in the detail view in Revit I switch off the model category – windows, and overlay my Window Cill detail component and annotate.


These types of families take no longer than 5 minutes to build.

Where the power truly comes in… is nested, detail components within hosted profiles. The one we use like the trigger on an AK is slab edge profiles with nested detail components. Wherever you cut through the slab edge there’s the detail.


Now play around with levels of visibility…..course, medium and fine, and you can easily set up nested details to drill down from 1:50 to 1:5 without touching or adding anything to the component for the various scales. The Steel Angle and Bolt or tie you see in the image is set to display at fine (1:10 and bigger). From 1:20 upwards there is no angle or bolt.


Over the course of the next few weeks starting today I will be posting a host of detail families to Family of the Week be sure to check it out.

Wednesday, September 13, 2006

Populating Google Earth with BIM


How cool is this. I can now take my Revit model and "plonk" it on to the site in Google Earth.

I originally came across this on David Lights Blog - a Plug-in for Revit to Google Earth. Downloaded….installed….. and my clients are going nuts!!!! Man, this works!!!!!!

For those of you in SA if you have been on my Advanced concepts training with Cadplan, the whole exercise on specify coordinates truly comes into it,s own now. Those that haven’t been yet best you book at Cadplan.

I reckon if I stated to a client about three years ago that we will soon be interacting with the world map and CAD software….. they would have thought I was the one that was nuts

Thanks to the likes of Google, Avatech, and Autodesk Revit, the trends in BIM technology go way beyond….

Check out: Avatech for the plugin download.
Google for the Earth download

Tuesday, September 12, 2006

Paradigm Shift found!

While gaining momentum in total “Revit Blogshare Domination” (on Blogshares) I managed to stumble across a few new cool Revit blogs.

The one that really caught my attention was Paradigm Shift by Sean D Burke.
Some really great articles plus more links to even more great articles.
Fresh reading, Be sure to check it out!!!!!

Another, for the Portuguese tongue, check out Up to Work.
I couldn’t really judge on the content as I am a multi-lingual illiterate.